Cakewalk // Documentation // SONAR X2 // Using the Transport, Markers, Punch and Loop modules
Table of Contents Previous Next Index

Controlling playbackControlling the transport ► Using the Transport, Markers, Punch and Loop modules

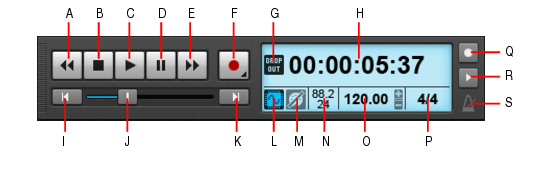
The Control Bar contains various modules that provide powerful control over playback. To show the Control Bar, click the Views menu and choose Control Bar, or press the C key.
A. Rewind B. Stop C. Play D. Pause E. Fast Forward F. Record G. Dropout indicator H. Current Now time (this space is also used for progress bars and “Waiting for sync” messages) I. Return to zero (RTZ) J. Position K. Jump to project end L. Audio Engine on/off M. Reset/Panic N. Sample rate and bit depth O. Tempo P. Meter Q. Metronome during record R. Metronome during playback S. Click to open metronome settings
The Markers module lets you navigate by markers and insert new markers. Inserting markers at important milestones in your project makes it easy to navigate through your project.
To insert a marker, do one of the following:
list-image
Click the Insert Marker button in the Markers module.
list-image
Click the Project menu and choose Insert Marker.
To jump to a marker, do one of the following:
list-image
Click the Previous Marker button or Next Marker button in the Markers module.
A. Jump to previous marker B. Jump to next marker C. Insert marker D. Current marker
1.
Right-click the Record button in the Transport module to open recording settings.
2.
Figure 39. The Punch module.
A. Auto-Punch On/Off B. Set Punch Time to Select C. Punch In Time D. Punch Out Time
list-image
Auto-Punch on/off . Enable/disable punch recording. Toggles punch recording on/off.
list-image
Set Punch Time to Selection 
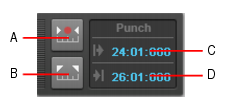
. Set the Punch In time to the start (From) time of the selection, and the Punch Out time to the end (Thru) time of the selection.
list-image
Punch In Time. The current Punch In time. Click to modify.
list-image
Punch Out Time. The current Punch Out time. Click to modify.
2.
list-image
Drag in the time ruler to make a time selection, then click the Set Punch Time to Selection button in the Punch module.
list-image
Click the Punch In TIme field in the Punch module and specify the desired punch in location, then click the Punch Out Time field and specify the punch out location.
4.
Click the Record button in the Transport module or press the R key.
SONAR plays the project, and begins recording on the selected track at the Punch In time you entered, then stops recording at the Punch Out time.
list-image
Rewind . Gradually rewind the project.
list-image
Stop . Stop playback.
list-image
Play . Start/stop playback.
list-image
Pause . Pause/resume playback.
list-image
Fast Forward . Gradually fast forward the project.
list-image
Record . Start recording (requires at least one track to be armed for recording). Right-click to access global record options. Click and keep the mouse button pressed for a brief moment to enable step recording.
list-image
Step Record. Open the Step Record window. For details, see Step recording.
list-image
RTZ . Rewind to the start of the project.
list-image
Progress Bar . Current position in the project. Drag to skip around in the project.
list-image
Go to End . Skip to the end of the project.
list-image
Time Display. The time display section shows useful information about the current project, including the Now time, sample rate and bit depth, tempo and meter. The following information is shown:
list-image
Current Now Time. The Now time shows your current location in the project. For details, see The Now time and how to use it. Click the time display to toggle between the following time formats:
MBT. Display time as Measure:Beat:Tick.
HMSF. Display time as Hour:Minute:Second:Frame. This format is also referred to as SMPTE time.
Milliseconds. Display time in milliseconds.
Samples. Display time in samples.
list-image
Current Tempo. The current tempo at the Now time. Double-click to change the current tempo.
list-image
Current Meter. The number of beats per measure and the note value of each beat at the current Now time. Click to change the meter. For details, see Setting the Meter and Key signatures.
list-image
Metronome Record on/off . Enable/disable the metronome during recording. Right-click to access Metronome settings.
list-image
Metronome Playback on/off . Enable/disable the metronome during playback. Right-click to access Metronome settings.
list-image
Metronome settings . Click the metronome icon to open the metronome preferences.
Figure 40. The Loop module.
A. Loop On/Off B. Set Loop Time to Select C. Loop Start Time D. Loop End Time
list-image
Loop on/off . Enable/disable playback looping.
list-image
Set Loop Times to Selection . Set the Loop Start time to the start (From) time of the selection, and the Loop End time to the end (Thru) time of the selection.
list-image
Loop Start Time. The current Loop Start time. Click to modify.
list-image
Loop End Time. The current Loop End time. Click to modify.

Copyright © 2024 Cakewalk, Inc. All rights reserved
Sitemap | Privacy Policy | Legal